Proper Toenail Cutting Angle to Prevent Problems
Find a Podiatrist Near You
Get same-day appointments with verified podiatrists. Insurance accepted.
Proper toenail cutting angle is one of those fundamentals of foot care that most people were never specifically taught — and the consequences show up in podiatry offices every day. Ingrown toenails, nail edge pain, skin irritation, and abnormal nail growth are frequently traced directly to how toenails were being trimmed: at the wrong angle, to the wrong length, with the wrong curve at the corners.
The good news is that understanding the proper toenail cutting angle requires no special skill — just clear information about what the correct technique is and why it matters. Getting this right consistently protects against some of the most common and most preventable nail problems that adults experience.
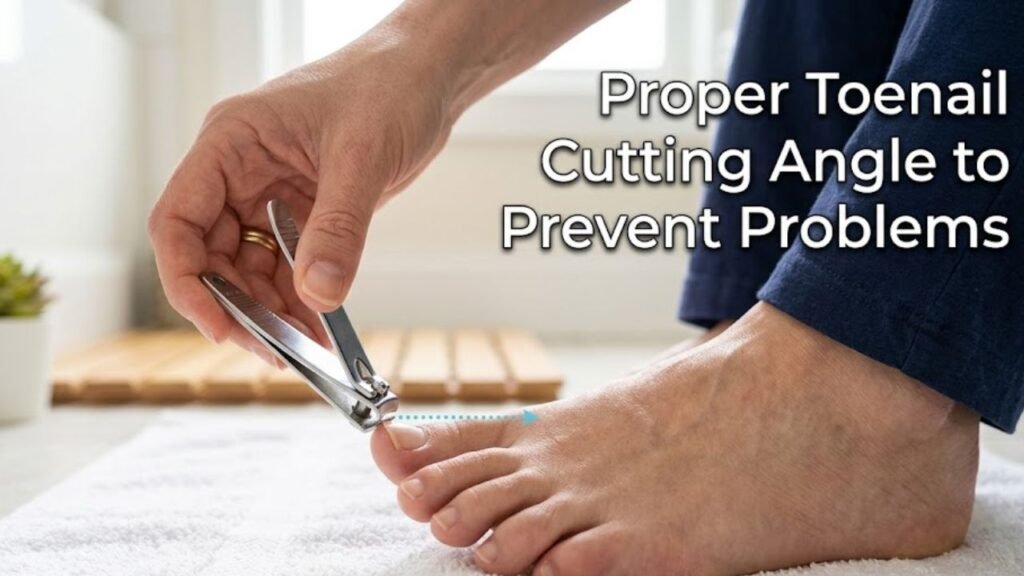
Why the Angle You Cut Your Toenails Matters
Toenails behave differently from fingernails in several important ways:
They experience constant mechanical load. Every step presses the nail plate against the nail bed. The shape and length of the nail determines how that load is distributed and whether the nail edge contacts surrounding skin.
They are thicker and harder. This means cuts produce sharper edges if technique is poor, and those sharp edges can then work their way into the nail fold with every step.
They are in an enclosed environment. Inside footwear, the nail cannot move freely — the toe box walls and shoe ceiling create pressure from multiple directions. The nail’s shape and length determine how it interacts with these surfaces.
They grow toward a boundary. Unlike fingernails which have relatively free space beyond the finger tip, toenails grow toward the hyponychium — the skin seal at the nail tip — and the nail folds on either side. Any growth direction or nail shape that directs the nail edge toward these tissue boundaries creates ingrown nail risk.
The proper toenail cutting angle addresses all of these factors by maintaining a nail shape and length that works with the nail’s mechanical environment rather than against it.
The Proper Toenail Cutting Angle: What It Means in Practice
The phrase “proper toenail cutting angle” refers to two distinct but related concepts:
1. The angle of the cut across the nail — straight across
The nail should be cut at approximately a 90-degree angle relative to the axis of nail growth — meaning the cut runs straight across the nail, perpendicular to the direction the nail grows forward. This produces a square or very slightly rounded free edge.
2. The depth at the nail corners — not deep
The proper toenail cutting angle does not cut deeply into the corners of the nail. The corner of the nail should remain visible above the level of the surrounding skin — not curved under and into the nail fold.
What this looks like:
When you finish trimming a toenail using the proper toenail cutting angle, the nail edge should be:
- Relatively flat across its width
- Not curved inward at the corners
- Visible as a thin white rim just beyond the skin at the corners
- At a moderate length — not flush with the skin, not significantly extending beyond it
What Happens With Each Incorrect Technique
Understanding why specific wrong techniques cause problems makes it easier to recognize and correct them.
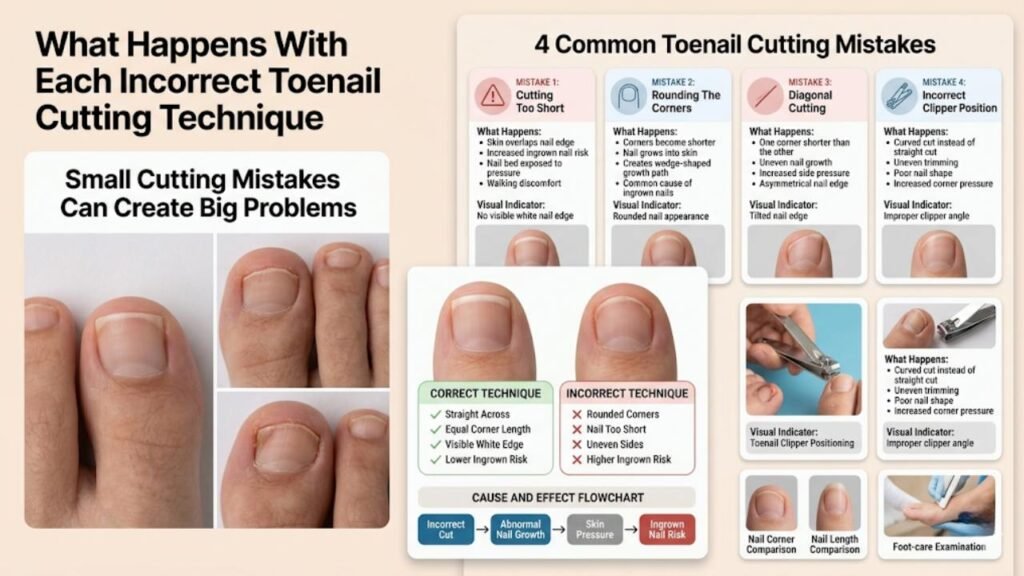
Cutting Too Short
When the nail is trimmed so short that the corners sit below the level of the surrounding skin, the skin on either side of the nail begins to overlap the nail tip. As the nail grows forward, it grows under this overlapping skin rather than over it — penetrating the nail fold tissue. This is the classic mechanism of ingrown toenail from improper cutting.
Additionally, cutting too short removes the nail plate’s protective function for the nail bed. The sensitive nail bed skin is then exposed to direct pressure from footwear and walking.
What “too short” looks like: The nail edge is at or below the level of the surrounding skin at the corners. There is no visible white rim beyond the skin at the nail tip corners.
Rounding the Corners
Rounding the corners — cutting the nail so that it curves inward from the center toward the corners, producing a rounded shape similar to how fingernails are often cut — is the most common reason the proper toenail cutting angle is not being used.
When the corners are cut curved inward, two problems develop:
- The nail corners are cut shorter than the nail center, meaning they sit closer to the skin
- The resulting curved nail shape creates a wedge that, as the nail grows forward, points the corners directly toward the nail fold tissue
The proper toenail cutting angle prevents this by keeping the corners at the same length as the center — removing the wedge and eliminating the directed pressure toward the nail fold.
Angled Diagonal Cuts
Some people cut their nails at a diagonal — one side of the nail shorter than the other — either intentionally or because of cutting difficulty (reaching the far side of the nail). This creates uneven nail edges with one corner typically shorter than the other, directing nail growth asymmetrically.
The proper toenail cutting angle is perpendicular to the nail growth direction — keeping both corners at equal length.
Using the Wrong Part of the Clipper
Nail clippers have a curved cutting jaw. When clippers are positioned on the nail, the curvature of the jaw naturally tends to cut the nail in a curved shape. Using the proper toenail cutting angle requires actively positioning the clipper to cut straight — sometimes requiring multiple overlapping clips across the nail width rather than one curved cut.
Step-by-Step: How to Cut Toenails Using the Proper Angle
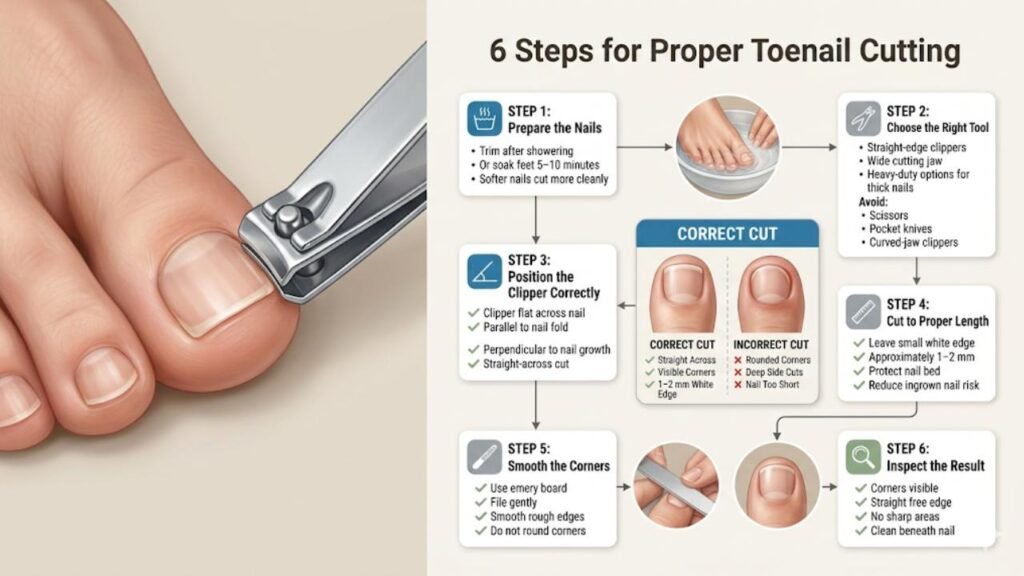
Step 1: Prepare the Nails
Trim toenails immediately after showering or bathing, or soak your feet in warm water for 5 to 10 minutes before trimming. Hydrated nails are more flexible, cut more cleanly, and are less likely to split or crack. Dry nails cut under the same pressure produce sharper, more irregular edges.
Step 2: Choose the Right Tool
Use toenail clippers specifically designed for toenails — these have a straighter cutting edge and more leverage than fingernail clippers. The jaw should be wide enough to cut across the nail in as few passes as possible.
For very thick nails: consider heavy-duty toenail clippers or large nail nippers with long handles that provide additional leverage without requiring excessive force that can cause splitting.
Do not use: scissors, pocket knives, fingernail clippers on thick toenails, or clippers with curved jaws that force a curved cut.
Step 3: Position the Clipper Correctly
This is where the proper toenail cutting angle is actually applied:
- Position the clipper jaw flat across the nail — approximately parallel to the nail fold at the base of the nail
- The clipper should be perpendicular to the direction the nail grows
- Make sure both sides of the clipper jaw are at the same height across the nail — not angled with one side higher than the other
If your clippers are too narrow to cut across the full nail width in one cut, make multiple cuts across the nail, keeping each cut perpendicular to the growth direction and overlapping slightly.
Step 4: Cut at the Appropriate Length
The proper toenail cutting angle is not just about direction — it is also about length. The correct length leaves a small, visible white rim of nail extending just beyond the skin at the nail tip. This rim:
- Protects the nail bed from direct pressure
- Prevents the surrounding skin from folding over the nail edge
- Provides enough nail plate to distribute mechanical forces
The white rim should be visible but minimal — approximately 1 to 2 mm. Longer than this creates catching risk inside footwear and increases mechanical load on the nail edge; shorter than this risks ingrowth.
Step 5: Handle the Corners
After the main cut, the corners may have small sharp or rough areas. Use a nail file or emery board — not scissors or a secondary cut — to smooth these. File gently in one direction from the corner toward the center of the nail. Do not file aggressively or cut the corners shorter with clippers.
The goal is smooth, not shorter. The corner should still be visible and extended above the skin level.
Step 6: Clean and Inspect
Use a soft nail brush to clean debris from beneath the nail edge. Inspect the nail: both corners should be visible, the free edge should be approximately level across the width, and the nail should not feel sharp when you run your finger along the edge.
The Specific Technique for Common Challenging Situations
Very Thick Nails
When nails are significantly thickened from fungal infection, aging, or onychogryphosis, the proper toenail cutting angle is the same — but the approach needs modification:
- Soak longer (10 to 15 minutes) to achieve maximum nail plate hydration before cutting
- Make multiple small cuts across the nail rather than attempting to cut across the full width in one motion — this gives more control and reduces splitting risk
- Work from the edges toward the center rather than trying to cut the entire nail in one clip
- After cutting, use a nail file to reduce surface thickness gradually rather than cutting extremely close to the nail bed
For nails that are too thick to safely manage at home, professional podiatric nail debridement is the appropriate alternative — not aggressive home cutting that risks injury.
Nails That Catch on Socks
If trimmed nails consistently catch on sock fabric, the free edge has a rough surface or sharp corner despite your best efforts. This is best addressed with a nail file to smooth the edge after cutting — file from the edge surface downward toward the underside of the nail to remove catching edges without reducing length.
Curved Nail Plates
Some nails naturally have significant lateral curvature (pincer nail tendency). The proper toenail cutting angle still applies — cut straight across — but particularly careful smoothing of the corners reduces the risk of sharp curved edges catching on surrounding tissue.
Elderly Patients or Limited Dexterity
Reaching toenails becomes more difficult with age, reduced flexibility, or conditions affecting hand dexterity. Options to maintain the proper toenail cutting angle include:
- Long-handled nail clippers that do not require significant bending
- Podiatric nail care every 6 to 10 weeks — the most appropriate option for patients who cannot safely self-trim
- Caregiver assistance with proper technique
When to Seek Professional Help Instead of Self-Trimming
The proper toenail cutting angle cannot be safely maintained by the patient in certain situations — and attempting to do so risks injury:
- Nails that are too thick to cut cleanly at home (common with onychauxis or significant fungal infection)
- Active ingrown toenail with inflammation, pain, or discharge
- Diabetes with any degree of peripheral neuropathy — reduced sensation makes accurate assessment of cutting depth and corner position unreliable
- Peripheral vascular disease — minor cutting injuries heal poorly
- Nails with structural abnormalities (extreme curvature, onychogryphosis) where standard cutting angle is difficult to achieve
For these situations, professional podiatric nail care provides the proper toenail cutting angle with clinical-grade instruments and appropriate safety assessment.
Frequently Asked Questions About Proper Toenail Cutting Angle
Should toenails be cut straight across or slightly curved?
The proper toenail cutting angle produces a straight or very slightly curved cut — the key is that the corners are not cut significantly shorter than the center. A slightly curved cut that still leaves both corners visible and above the skin level is acceptable; a deeply curved cut that brings corners level with or below the skin creates ingrown nail risk.
How do I know if I’m cutting my toenails too short?
You have cut too short if you cannot see a thin white rim of nail extending slightly beyond the surrounding skin at the corners after trimming. The corners should be visible; if the surrounding skin completely covers the nail corners, the nail is too short.
Why do I keep getting ingrown toenails if I try to cut straight?
Check whether you are cutting the corners level with the center of the nail — or whether they are ending up shorter despite your straight-cut intention. The clipper’s curved jaw often produces a curved cut without the user realizing it. Also assess nail length — even a straight cut can produce ingrown nail problems if the nail is cut too short overall.
Can I file the corners down if they feel sharp after cutting?
Yes — gently filing in one direction from the corner toward the center smooths sharp edges without removing length. This is preferable to making a second cut at the corner with clippers, which tends to further reduce corner length and worsen ingrown nail risk.
Summary
The proper toenail cutting angle — cutting straight across the nail at a 90-degree angle to the direction of growth, leaving both corners visible above the skin level, at a moderate length — prevents the most common causes of ingrown toenail, nail edge irritation, and nail fold injury from home nail trimming.
The most common mistakes — cutting corners shorter than the nail center, trimming too short overall, and cutting at a diagonal — all create nail edge configurations that direct the growing nail toward surrounding tissue. Correcting these habits with the proper toenail cutting angle, appropriate tools, and correct nail length requires only clear information and consistent practice.
For patients who cannot safely self-trim due to nail thickness, health conditions, or physical limitations, professional podiatric nail care provides the safest alternative.
Struggling to get an appointment?
We help patients in your area bypass clinic waitlists by instantly finding verified podiatry doctors who accept their insurance.